User Guide
 |
CourseBook (v1.6) |
CourseBook is a desktop app that helps university students keep track of their course mates and the modules they’re taking. It’s designed to be fast and efficient. Just type in simple commands to add friends, see who’s taking which module, and find the right person to ask when you’re stuck on an assignment.
Even though CourseBook runs in a window like other apps, it’s built for speed: instead of clicking through menus, you type short commands to get things done quickly. Don’t worry if you’re new to this. CourseBook comes with helpful examples and a guide to get you started.
Need to find your course friends? Use CourseBook!
Table of Contents
- 1. Introduction
- 2. Quick Start
- 3. Understanding Command Format
-
4. Features
-
4.1 Person Management Commands
- 4.1.1 Adding a person:
add - 4.1.2 Editing a person:
edit - 4.1.3 Deleting person(s):
deleteorrm - 4.1.4 Listing all persons:
listorls - 4.1.5 Finding persons:
findorf - 4.1.6 Viewing detailed information:
viewperson - 4.1.7 Adding a birthday:
bday - 4.1.8 Managing favourites:
favouriteandunfavourite - 4.1.9 Listing favourite persons:
favs
- 4.1.1 Adding a person:
- 4.2 Course Management Commands
- 4.3 Display Commands
- 4.4 Sorting Commands
- 4.5 History and Information Commands & Features
- 4.6 General Application Commands
- 4.7 Undo & Redo
- 4.8 UI Features
-
4.1 Person Management Commands
- 5. Command Summary
- 6. Data & Storage
- 7. FAQ
- 8. Known Issues
- 9. Glossary
1. Introduction
1.1 Who This Guide Is For
This User Guide is designed for:
- Students who need to manage contacts by course enrollment
- First-time users setting up CourseBook for the first time
- Existing users looking for detailed command references
Prerequisites:
- Basic familiarity with command-line interfaces
- Java 17 installed on your computer
- Supported OS: Windows, macOS, or Linux
1.2 What CourseBook Does
CourseBook solves common academic networking challenges:
Problem: “I need help with CS2103T Tutorial 6 but I don’t know who else is taking this module.”
Solution: Use list c/CS2103T to instantly see all your contacts enrolled in CS2103T.
Problem: “I have too many contacts and need to organize them better.”
Solution: Tag contacts by course, mark favourites with favourite, and use find to search across multiple fields.
Typical Workflows:
- Finding study partners: Add contacts → Tag them with courses → List by course → View details
-
Managing favourites: Mark close friends as favourites → Use
favsto quickly access them -
Quick lookups: Use
findwith partial names/emails/tags to locate contacts instantly - Organizing courses: Use color-coded courses for visual clarity → Edit course colors globally
2. Quick Start
Follow these steps to get CourseBook up and running:
Step 1: Install Java 17
Ensure you have Java 17:
- Windows/Linux: Download from Oracle’s website
- macOS: Follow the precise installation guide
Verify installation by opening a terminal and running:
java -version
You should see output indicating Java 17.
Step 2: Download CourseBook
- Download the latest
coursebook.jarfile from our releases page. - Create a folder on your computer where you want to store CourseBook (e.g.,
CourseBookin your Documents folder). - Move the downloaded
coursebook.jarfile into this folder.
Step 3: Launch CourseBook
- Open a command terminal
- Navigate to the folder containing
coursebook.jar:cd path/to/your/CourseBook/folder - Run the application:
java -jar coursebook.jar
A window similar to the one below should appear in a few seconds:
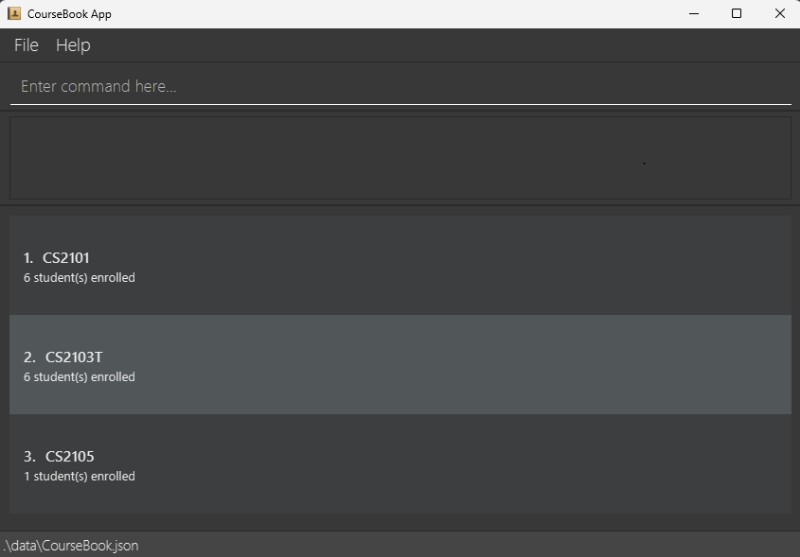 Figure 1: CourseBook main interface with sample data.
Step 4: Explore the Interface
The CourseBook interface has several key areas:
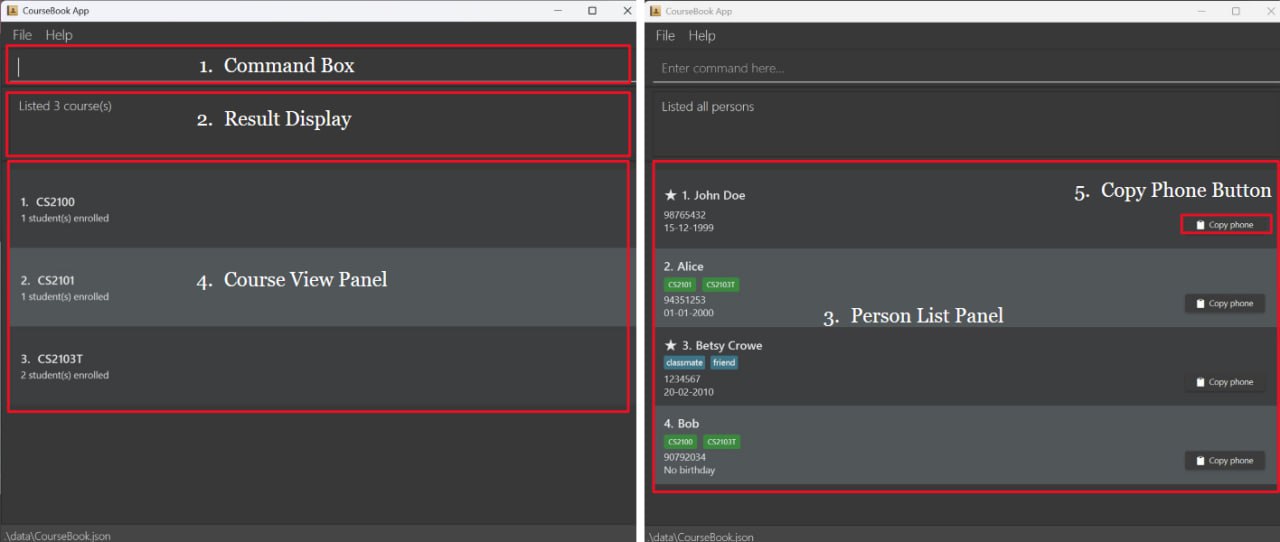 Figure 2: CourseBook UI components breakdown.
- Command Box (top): Type your commands here and press Enter to execute
- Result Display (below command box): Shows feedback and results from your commands
- Person List Panel (right): Displays contacts matching your current view/filter
- Course View Panel (left): Shows all courses with enrollment counts
- Copy Button (on each person card): Click to copy phone number to clipboard
Step 5: Try Your First Commands
Type each command in the command box and press Enter:
-
List all contacts:
listExpected: All sample contacts appear in the person list panel.
-
Add a new contact:
add n/Alex Yeoh p/87438807 e/alexyeoh@example.com a/Blk 30 Geylang Street 29, #06-40 c/CS2103T,yellow
Expected: A new contact “Alex Yeoh” appears at the bottom of the list with a yellow CS2103T course tag.
-
Find contacts:
find n/alexExpected: Only contacts with names containing “alex” are shown.
-
List contacts by course:
list c/CS2103TExpected: Only contacts enrolled in CS2103T are displayed.
-
View detailed information:
viewperson 1Expected: A popup window shows detailed information about the first person in the list.
-
Delete a contact:
delete 1Expected: A confirmation dialog appears showing the contact to be deleted. Click “OK” to confirm or “Cancel” to abort.
-
Get help:
helpExpected: A help window opens displaying all available commands with examples.
Congratulations! You’re now ready to use CourseBook. Proceed to Section 4: Features for complete command documentation.
3. Understanding Command Format
Before diving into specific commands, familiarize yourself with these conventions:
![]() Command Format Notes:
Command Format Notes:
-
UPPER_CASE words are parameters you supply.
- Example:
add n/NAME→ you provide the actual name likeadd n/John Doe
- Example:
-
[Square brackets] indicate optional parameters.
- Example:
add n/NAME [t/TAG]→ can use asadd n/John Doe t/friendor justadd n/John Doe
- Example:
-
Ellipsis
...means the parameter can be used multiple times (including zero times).- Example:
[t/TAG]...→ can use as ` ` (0 times),t/friend,t/friend t/classmate, etc.
- Example:
-
Parameters can be in any order unless stated otherwise.
- Example:
n/NAME p/PHONEis the same asp/PHONE n/NAME
- Example:
-
INDEX always refers to the position shown in the currently displayed list (not the full list).
- Example: After
find alex,delete 1deletes the first person in the search results, not the first person in the full database.
- Example: After
- Indices are 1-based (first item is 1, not 0).
If using a PDF version of this guide, be careful when copying multi-line commands. Space characters around line breaks may be omitted when pasted.
4. Features
4.1 Person Management Commands
4.1.1 Adding a person: add
Adds a new contact to your coursebook.
Format: add n/NAME p/PHONE e/EMAIL a/ADDRESS [t/TAG]... [c/COURSE_CODE[,COLOR]]...
Parameters:
-
n/NAME(Required) — Full name -
p/PHONE(Required) — Phone number (valid format required – 7-15 digits) -
e/EMAIL(Required) — Email address (valid format required) -
a/ADDRESS(Required) — Physical address (any characters) -
t/TAG(Optional, multiple allowed) — Tags for categorization (only alphanumeric characters e.g. bestFriend). -
c/COURSE_CODE[,COLOR](Optional, multiple allowed) — Course code with optional color
Available Course Colors: green, yellow, red, blue, orange, purple, pink, gray
- If no color is specified,
greenis used by default. - If a course code already exists with a color, the existing color is enforced globally.
Name Field Rules:
The n/ (name) parameter accepts the following characters:
- Letters and digits (a-z, A-Z, 0-9)
- Space ( )
- Apostrophe (‘)
- Slash (/)
- Hyphen (-)
- Period (.)
- Comma (,)
Examples that match:
- John
- Jean-Luc
- O’Connor
- Mary Anne
- Smith/Jones
- Dr. John
- J. K. Rowling
- Smith, Jr.
- Bob S/o Bobby
- Mary D/o Mari
Still prevents:
- Names starting with punctuation or space (e.g., -John, ‘John, John)
- Completely empty strings
- Each person can be associated with any number of tags and courses, including none.
- Use tags for categorization (e.g.,
friend, groupmate, ta). - Use colored course tags for quick visual identification.
Examples:
add n/John Doe p/98765432 e/johnd@example.com a/John street, block 123, #01-01
Adds John Doe without tags or courses
add n/Betsy Crowe t/friend e/betsycrowe@example.com a/Newgate Prison p/1234567 t/classmate
Adds Betsy Crowe with two tags (friend, classmate)
add n/Alice p/94351253 e/alice@example.com a/123, Jurong West Ave 6 c/CS2103T,yellow c/CS2101,blue
Adds Alice with two color-coded courses
Expected Output:
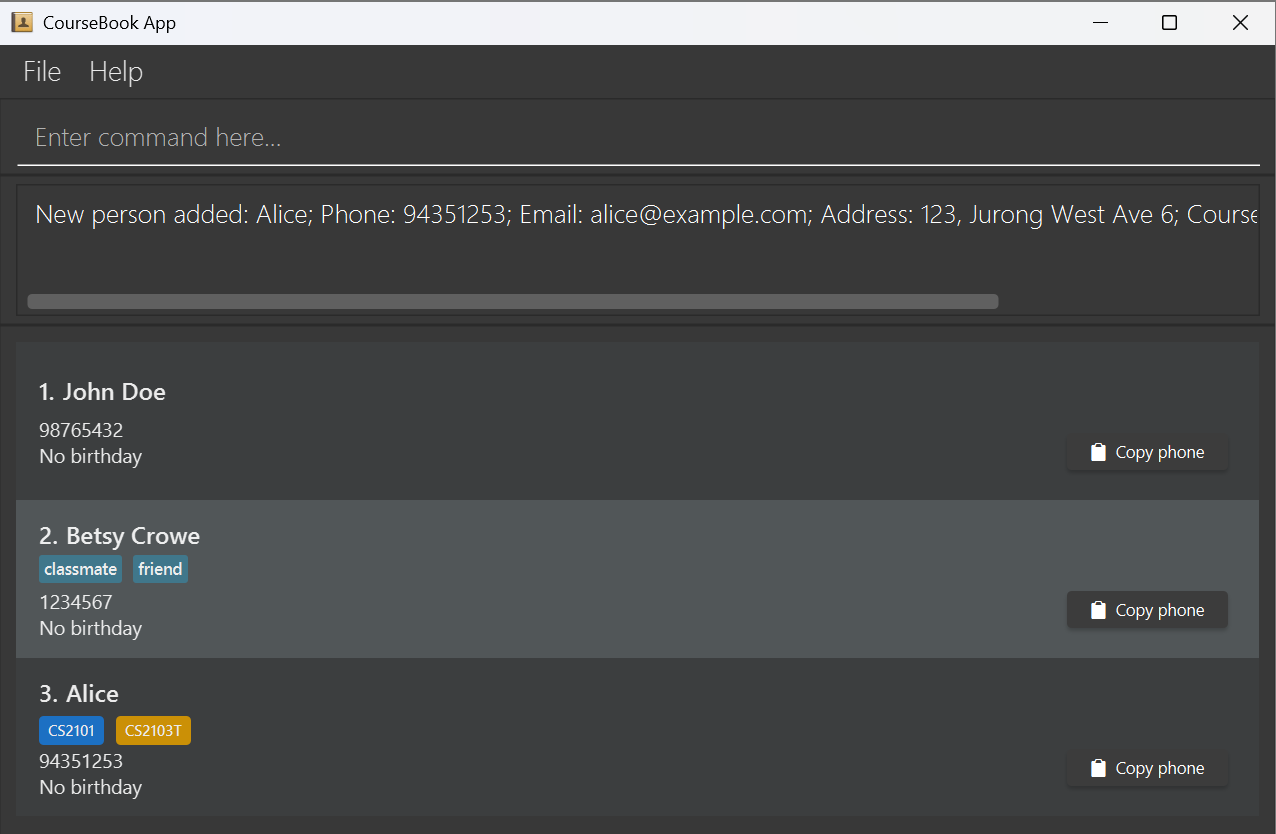 Figure 3: State of CourseBook after adding the three people.
- Duplicate detection checks name, phone, and email. If any match an existing contact, the add will fail.
- Empty tag i.e.
edit 1 t/ will remove all tags. - Adding multiple tags with one of them being empty i.e.
edit 1 t/ t/husband is not allowed. - Duplicate tags for the same person i.e.
edit 1 t/hello t/hello will only insert one tag hello. Related: Editing a person, Adding courses to a person
4.1.2 Editing a person: edit
Edits an existing contact’s details.
Format: edit INDEX [n/NAME] [p/PHONE] [e/EMAIL] [a/ADDRESS] [t/TAG]...
Parameters:
-
INDEX(Required) — Position in the currently displayed list (positive integer) - At least one optional field must be provided
Behavior:
- Existing values are replaced by new input values
- When editing tags: all existing tags are replaced (not cumulative)
- A person’s birthday and favourite status will remain unchanged unless explicitly edited.
- To clear all tags: use
t/with no value
- After editing, the view automatically switches to show all persons (not just the filtered list).
- Use
addcourse or removecourse if you want to modify courses. Examples:
edit 1 p/91234567 e/johndoe@example.com
Edits the 1st person’s phone and email
edit 2 n/Betsy Crowe t/
Edits the 2nd person’s name and clears all tags
Expected Output:
Edited Person: Betsy Crowe; Phone: 1234567; Email: betsycrowe@example.com; Address: Newgate Prison; Tags: ;
Error Messages:
-
"The person index provided is invalid"— Index out of range -
"Index cannot be a negative integer."— Negative index -
"At least one field to edit must be provided."— No fields specified - Error message for duplicates detected in name/phone number/email
Related: Adding a person
4.1.3 Deleting person(s): delete or rm
Deletes one or more contacts from the coursebook. Can delete by index or by name.
Format (by index): delete INDEX [INDEX]...
Format (by name): delete NAME[, NAME]...
Alias: rm can be used instead of delete
Parameters:
-
By index: Space-separated positive integers (e.g.,
1 2 3) -
By name: Comma-separated names, case-insensitive (e.g.,
John Doe, Jane Smith) - Cannot mix: You cannot use indices and names in the same command
Confirmation Required: Before deletion, a confirmation dialog appears showing the contacts to be deleted. You must click “OK” to confirm or “Cancel” to abort.
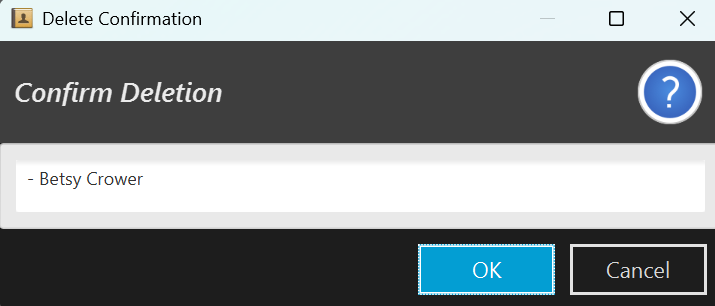 Figure 4: Delete confirmation window pop up.
* Make sure you review the confirmation dialog carefully before clicking “OK”.
Behavior:
- Invalid indices: If some indices are invalid, they are shown in the confirmation dialog with warnings.
- Name matching: Full name must match (case-insensitive). Partial names won’t work.
* After
find or list c/COURSE, indices refer to the filtered results, not the full list. * If unsure about names, use
find first to see exact names, then delete by index. Examples:
delete 1
Shows confirmation dialog for the 1st person in the current list
delete 1 2 3
Shows confirmation dialog for the 1st, 2nd, and 3rd persons
delete John Doe
Shows confirmation dialog for person named “John Doe”
delete John Doe, Jane Smith
Shows confirmation dialog for “John Doe” and “Jane Smith”
list
delete 2
Deletes the 2nd person in the full address book (after confirming)
find Betsy
delete 1
Deletes the 1st person in the find results (after confirming)
Expected Output (before confirmation):
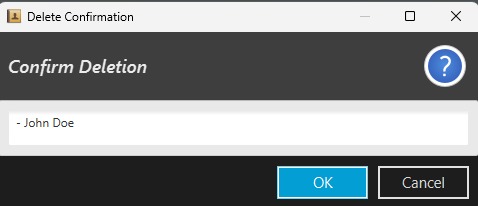
Figure 5: Delete confirmation screen for singular person.
Expected Output (after confirmation):
Deleted Person: John Doe; Phone: 98765432; Email: johnd@example.com; Address: John street, block 123, #01-01; Courses: ; Tags:
Expected Output (multiple deletions):
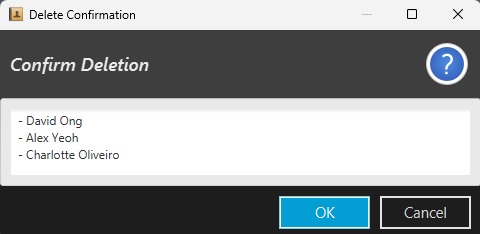
Figure 6: Delete confirmation screen for multiple persons.
Expected Output (with warnings):
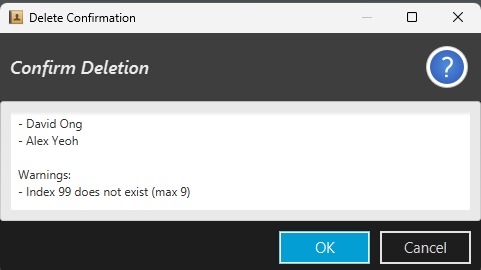
Figure 7: Delete confirmation screen for multiple persons and invalid index provided.
Error Messages:
-
No valid persons to delete. No contact found with name: Alicia"— Name doesn’t match any contact -
"No valid persons to delete."— Index is out of bounds -
"The person index provided is invalid"— Index is negative or zero
Related: Undoing commands, Finding persons
4.1.4 Listing all persons: list or ls
Shows all contacts in your coursebook.
Format: list
Alias: ls
Parameters: None
Expected Output:
Listed all persons
followed by a list view of all contacts.
Related: Listing persons by course, Finding persons
4.1.5 Finding persons: find or f
Finds contacts by searching across multiple fields with partial/substring matching.
Format: find [n/NAME_KEYWORDS] [p/PHONE_KEYWORDS] [e/EMAIL_KEYWORDS] [a/ADDRESS_KEYWORDS] [t/TAG]...
Alias: f
Parameters:
-
n/NAME_KEYWORDS(Optional) — Name search keywords -
p/PHONE_KEYWORDS(Optional) — Phone search keywords -
e/EMAIL_KEYWORDS(Optional) — Email search keywords -
a/ADDRESS_KEYWORDS(Optional) — Address search keywords -
t/TAG(Optional) — Tag search - No prefixes: If no prefixes are used, input is treated as name search
Search Logic:
-
Inside one field (like name or email): If you give multiple keywords, it will match any of them.
Example:
n/Alice Bobfinds contacts with either “Alice” or “Bob” in the name. - Across different fields:
It will return results if any field matches your keywords.
Example:
find n/Alice p/123 t/TA. If “Alice” is in the name, or “123” is in the phone number, or “TA” is in the tag, it still counts. - Case-insensitive and partial/substring matching
- Use partial matches to find contacts quickly:
find n/ali finds “Alice”, “Alicia”, etc. - Combine multiple fields to broaden your search:
find n/John e/@gmail finds anyone named John OR with a Gmail address. - Unknown prefixes are rejected to prevent typos.
- Names containing
/ with 1-2 letters before the / (e.g., S/o, Al/Johnson) must use the n/ prefix when searching. - Use
find n/S/o instead of find S/o to avoid prefix ambiguity. - Names with 3+ letters before
/ (e.g., Smith/Johnson) work without prefixes: find Smith/Johnson ✓ Examples:
find n/Alice n/Bob
Finds persons with names containing “Alice” OR “Bob”
find n/Ali
Finds “Alice”, “Alicia”, “Alison” (partial match)
find p/9123 e/example.com
Finds phone containing “9123” OR email containing “example.com”
find t/fri
Finds persons with tags containing “fri” (e.g., “friend”)
find n/Alice t/friend
Finds persons with name containing “Alice” OR tag containing “friend”
find alex david
No prefixes → name-only search for “alex” or “david”
find n/S/o
Finds persons with names containing “S/o” — note: must use n/ prefix for names with 1-2 letters before /
find Smith/Johnson
Finds persons with names containing “Smith/Johnson” — works without prefix for names with 3+ letters before /
Expected Output (found):
3 persons listed!
Expected Output (not found):
No such contact found
Error Messages:
- Unknown prefix error if you use prefixes other than
n/,p/,e/,a/,t/ - Invalid name keywords if names contain non-acceptable characters
Related: Listing all persons, Listing by course
4.1.6 Viewing detailed information: viewperson
Shows detailed information about a specific contact in a popup window.
Format (by index): viewperson INDEX
Format (by name): viewperson NAME
Parameters:
-
INDEX— Position in currently displayed list (positive integer) -
NAME— Full name of the person (case-insensitive, must match exactly)
Behavior:
- Name matching is case-insensitive and automatically trims whitespace.
Examples:
viewperson 1
Shows details of the 1st person in the current list
viewperson John Doe
Shows details of the person named “John Doe”
Expected Output:
Showing details for: David Ong; Phone: 91031282; Email: lidavid@example.com; Address: Blk 436 Serangoon Gardens Street 26, #16-43; Courses: [CS2103T][CS2105][CS2101]; Tags: [TA]
A popup window displays full contact details including courses, tags, birthday, etc.
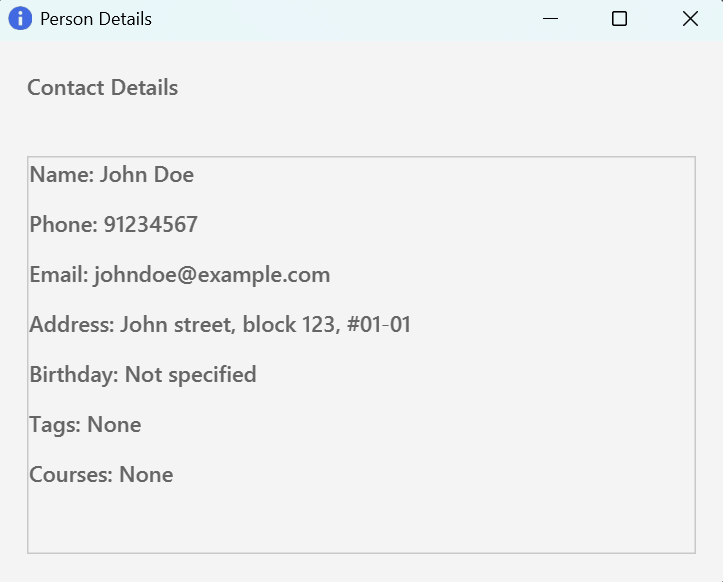 Figure 8: Popup window of the details of the person named “John Doe”.
Error Messages:
-
"The person index provided is invalid"— Index out of range -
"Index cannot be a negative integer."— Negative index -
"No contacts found! Please specify correct contact names."— Name doesn’t match
Related: Finding persons, Listing persons
4.1.7 Adding a birthday: bday
Adds a birthday to an existing contact.
Format: bday INDEX b/BIRTHDAY
Parameters:
-
INDEX(Required) — Position in currently displayed list (positive integer) -
b/BIRTHDAY(Required) — Birthday inDD-MM-YYYYformat
Constraints:
- Date must be valid (e.g., 29-02-2000 is valid, 31-02-2000 is not)
- Birthday cannot be in the future
- Birthday cannot be before 01-01-1900
- Only one birthday per person
Behavior:
- If person already has a birthday, it is updated to the new one
- If the new birthday is the same as the existing one, the command fails
* After adding birthdays, use
sortb to sort contacts by upcoming birthdays. * Birthdays are displayed on person cards and in the detail view.
Examples:
bday 1 b/20-02-2007
Adds birthday 20th February 2007 to the 1st person
bday 2 b/15-12-1995
Adds birthday 15th December 1995 to the 2nd person
Expected Output:
Added birthday: 20-02-2007 John Doe; Phone: 98765432; Email: johnd@example.com; Address: John street, block 123, #01-01; Tags: ; Courses:
Error Messages:
-
"The person index provided is invalid"— Index out of range -
"Index cannot be a negative integer."— Negative index -
"Birthday has already been added!"— Trying to add the same birthday again
Related: Sorting by birthday, Editing a person
4.1.8 Managing favourites: favourite and unfavourite
Mark contacts as favourites or remove them from favourites.
Format (mark as favourite, by index): favourite INDEX
Format (mark as favourite, by name): favourite NAME
Format (remove from favourites, by index): unfavourite INDEX
Format (remove from favourites, by name): unfavourite NAME
Parameters:
-
INDEX— Position in currently displayed list (positive integer) -
NAME— Full name (case-insensitive, must match exactly)
Behavior:
- favourite persons are marked with a star (★) in the person list
- Cannot favourite a person who is already favourited
- Cannot unfavourite a person who is not favourited
- Name matching is case-insensitive with automatic whitespace trimming
* Use
favs command to quickly view all your favourite contacts. Examples:
favourite 1
Marks the 1st person as favourite
favourite John Doe
Marks “John Doe” as favourite
unfavourite 2
Removes the 2nd person from favourites
unfavourite Jane Smith
Removes “Jane Smith” from favourites
Expected Output (favourite):
Marked as favourite: John Doe; Phone: 98765432; Email: johnd@example.com; Address: John street, block 123, #01-01; Tags: ; Courses:
Expected Output (unfavourite):
Removed from favourites: Jane Smith; Phone: 91234567; Email: janesmith@example.com; Address: Main St; Tags: ; Courses:
Error Messages:
-
"This person is already marked as favourite."— Trying to favourite an already favourited person -
"This person is not marked as favourite."— Trying to unfavourite a person who isn’t favourited -
"Index cannot be a negative integer."— Negative index provided
Related: Listing favourites
4.1.9 Listing favourite persons: favs
Shows all contacts marked as favourites.
Format: favs
Parameters: None
Expected Output (with favourites):
Listed all favourite contacts.
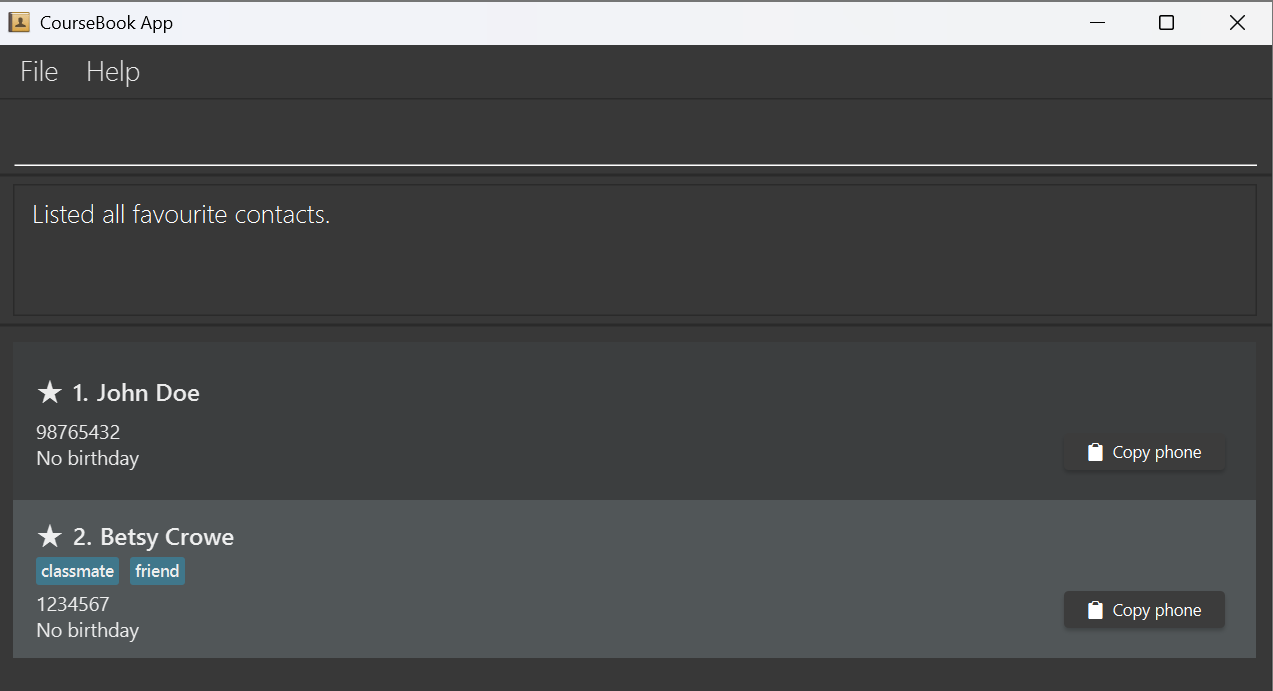 Figure 9: List of favourite contacts.
Expected Output (no favourites):
No favourite contacts yet.
Related: Managing favourites
4.2 Course Management Commands
4.2.1 Adding courses to a person: addcourse
Adds one or more courses to a contact without replacing existing courses.
Format: addcourse INDEX c/COURSE_CODE[,COLOR] [c/COURSE_CODE[,COLOR]]...
Parameters:
-
INDEX(Required) — Position in currently displayed list (positive integer) -
c/COURSE_CODE[,COLOR](Required, multiple allowed) — Course code with optional color
Available Colors: green, yellow, red, blue, orange, purple, pink, gray
Behavior:
- Preserves existing courses
- If a course code already exists globally, and you supply a different color, the global color is updated
- If a new course code is added without color, it defaults to
green
* Use
addcourse when you want to add courses without affecting existing ones. * Course colors are global — changing a color for CS2103T changes it for all contacts with CS2103T.
Examples:
addcourse 1 c/CS2103T,yellow
Adds CS2103T with yellow color to the 1st person
addcourse 2 c/CS2101 c/CS2040S,blue
Adds CS2101 (default green) and CS2040S (blue) to the 2nd person
Expected Output:
Added courses to Person: John Doe; Phone: 98765432; Email: johnd@example.com; Address: John street, block 123, #01-01; Tags: ; Courses: [CS2103T], [CS2101]
Error Messages:
-
"The person index provided is invalid"— Index out of range -
"Index cannot be a negative integer."— Negative index -
"This person already has one or more of these courses"— Duplicate course
Related: Removing courses, Editing course color
4.2.2 Removing courses from a person: removecourse
Removes one or more courses from a contact.
Format: removecourse INDEX c/COURSE_CODE [c/COURSE_CODE]...
Parameters:
-
INDEX(Required) — Position in currently displayed list (positive integer) -
c/COURSE_CODE(Required, multiple allowed) — Course codes to remove (case-insensitive)
Behavior:
- Only removes courses that exist for the person
- If none of the specified courses exist for the person, command fails
Examples:
removecourse 1 c/CS2103T
Removes CS2103T from the 1st person
removecourse 2 c/CS2101 c/CS2040S
Removes CS2101 and CS2040S from the 2nd person
Expected Output:
Removed courses from Person: John Doe; Phone: 98765432; Email: johnd@example.com; Address: John street, block 123, #01-01; Tags: ; Courses:
Error Messages:
-
"The person index provided is invalid"— Index out of range -
"Index cannot be a negative integer."— Negative index -
"None of the specified courses exist for this person"— Courses not found
Related: Adding courses, Editing a person
4.2.3 Editing course color globally: editcourse
Sets the color for a course code globally across all contacts.
Format: editcourse c/COURSE_CODE,COLOR
Parameters:
-
c/COURSE_CODE,COLOR(Required) — Course code and color (comma-separated)
Available Colors: green, yellow, red, blue, orange, purple, pink, gray
Behavior:
- Updates the color for the course code globally
- All contacts with this course code will reflect the new color
- Both course code and color must be provided
* Use consistent colors for similar course types (e.g., yellow for all CS courses, blue for math courses).
* This helps with visual organization when viewing contact lists.
Examples:
editcourse c/CS2103T,red
Changes CS2103T color to red for all contacts
editcourse c/CS2101,green
Changes CS2101 color to green for all contacts
Expected Output:
Updated color for CS2103T to red
Error Messages:
-
"Course code and color must be provided"— Missing course code or color
Related: Adding courses, Listing courses
4.2.4 Listing all courses: listcourses
Lists all unique courses in the coursebook.
Format: listcourses
Parameters: None
Behavior:
- Shows all courses with their enrollment counts
- Switches to the courses view panel
Expected Output (with courses):
Listed 5 course(s)
Expected Output (no courses):
No courses found in the course book
Related: Listing persons by course, Summary
4.2.5 Listing persons in a course: list c/COURSE_CODE
Shows all contacts enrolled in a specific course.
Format: list c/COURSE_CODE
Alias: ls c/COURSE_CODE
Parameters:
-
c/COURSE_CODE(Required) — Course code to filter by (case-insensitive)
Behavior:
- Course code matching is case-insensitive
- If course doesn’t exist, an empty list is shown with an error message
Examples:
list c/CS2103T
Shows all persons taking CS2103T
ls c/cs2101
Shows all persons taking CS2101 (case-insensitive)
Expected Output (found):
Listed all persons in CS2103T
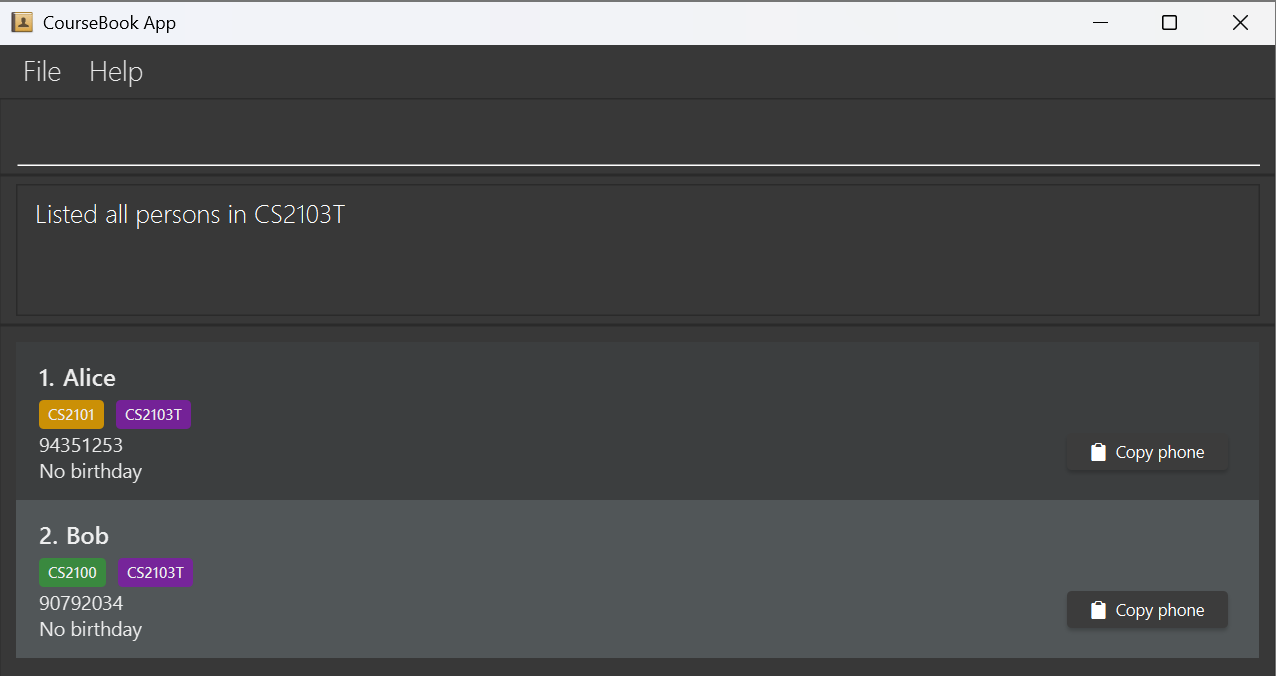 Figure 10: List of contacts taking course CS2103T.
Expected Output (not found):
No such course: CS9999
Related: Listing all persons, Listing courses
4.3 Display Commands
4.3.1 Changing application theme: theme
Changes the application’s visual theme. The theme is not persistent i.e. will revert to the default dark theme when you launch the application.
Format: theme THEME_NAME
Available Themes:
-
dark— Dark theme (default) -
blue— Blue theme -
love— Love theme (pink/romantic colors) -
tree— Tree theme (nature-inspired)
Parameters:
-
THEME_NAME(Required) — One of:dark,blue,love,tree(case-insensitive)
Behavior:
- Theme change is applied immediately
- Cannot switch to the currently active theme
* Choose a theme that matches your preferences or reduces eye strain.
Examples:
theme blue
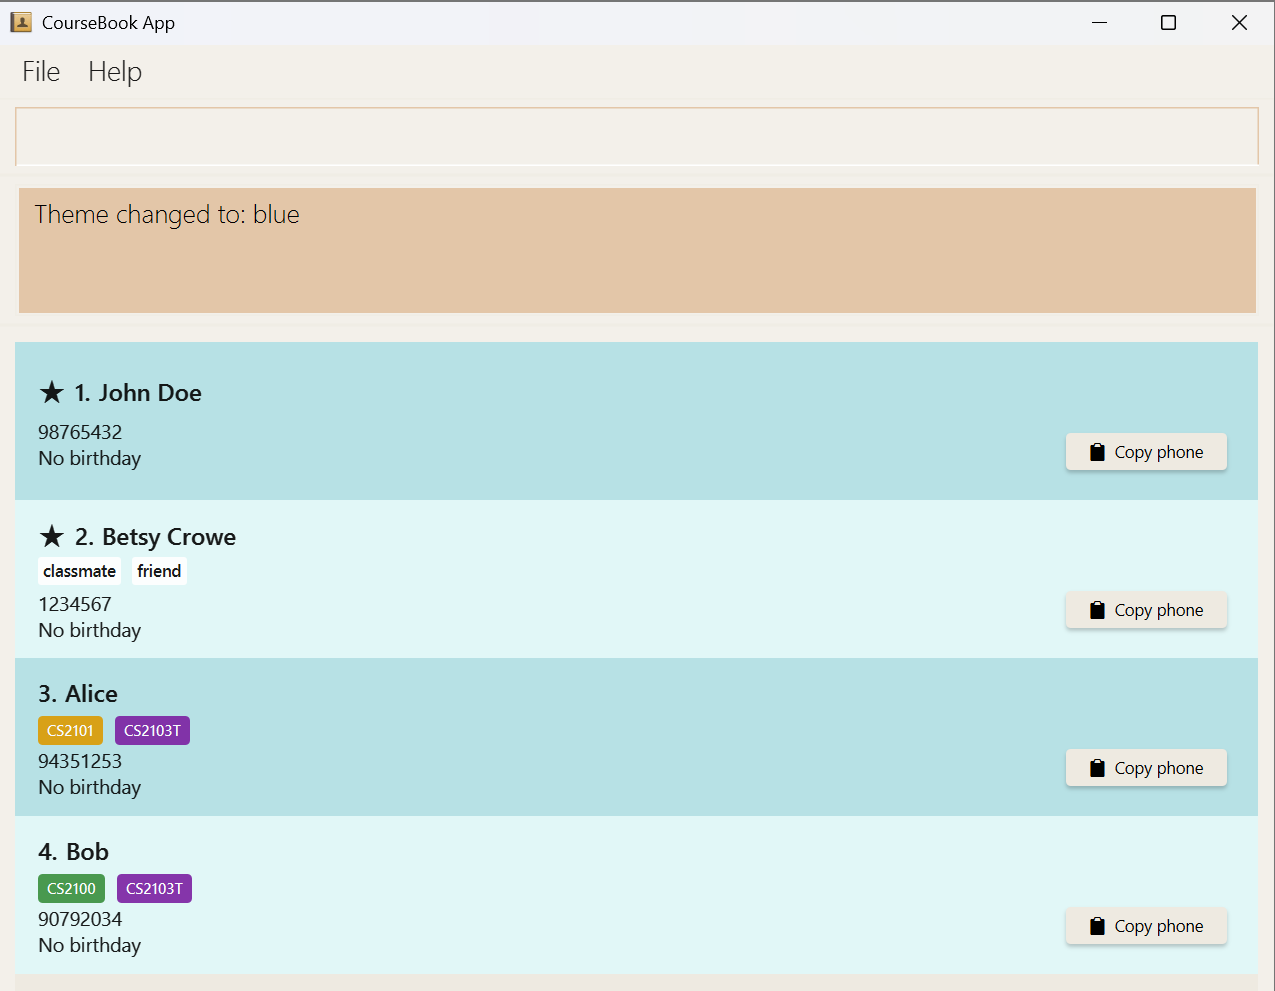 Figure 12: Changes to blue theme.
theme dark
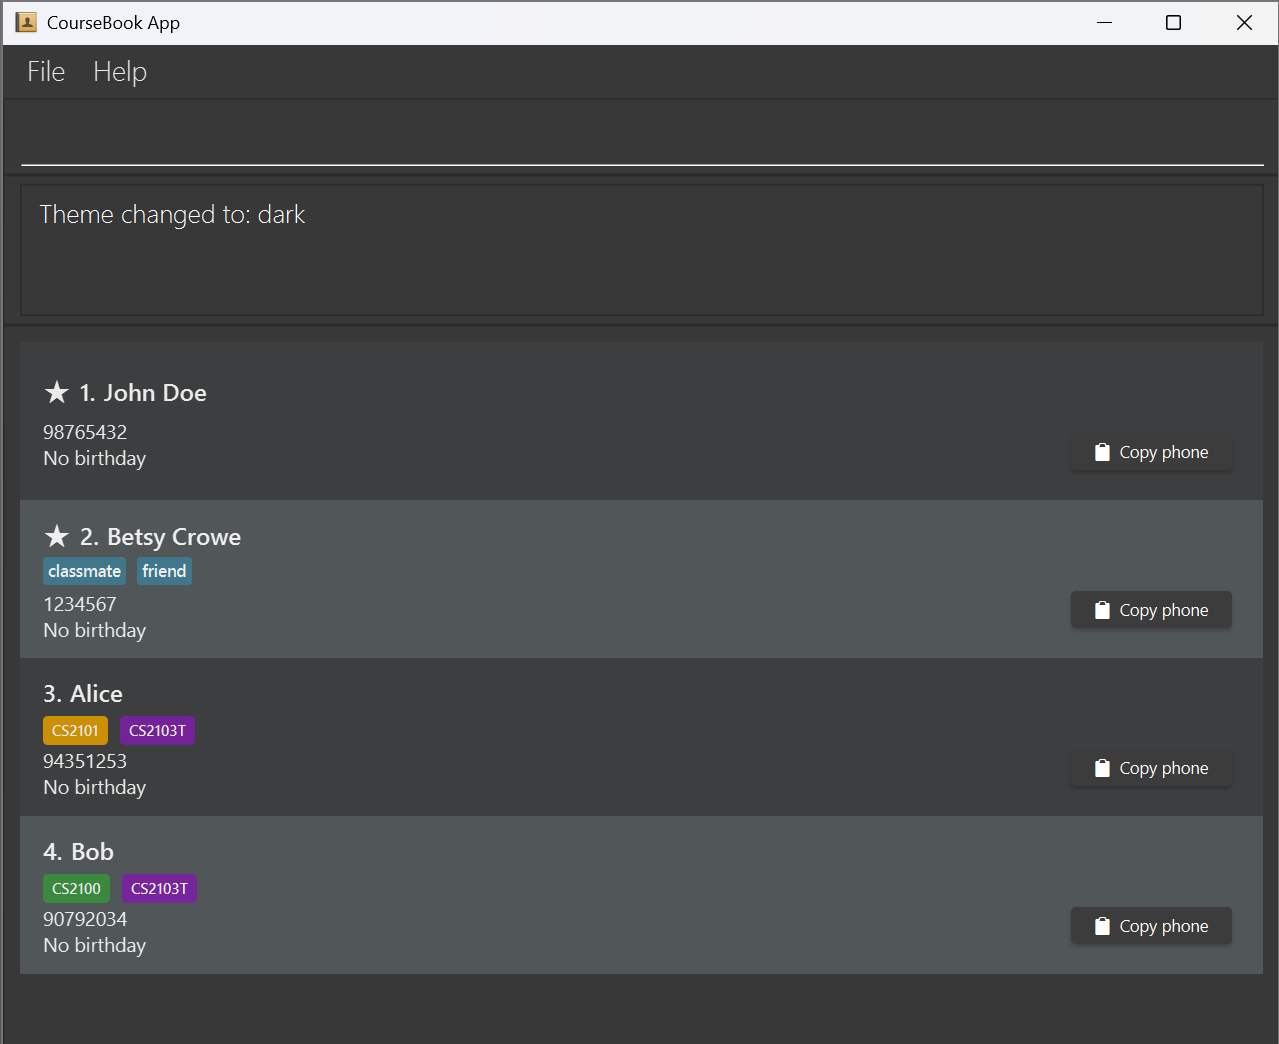 Figure 13: Changes to dark theme.
theme love
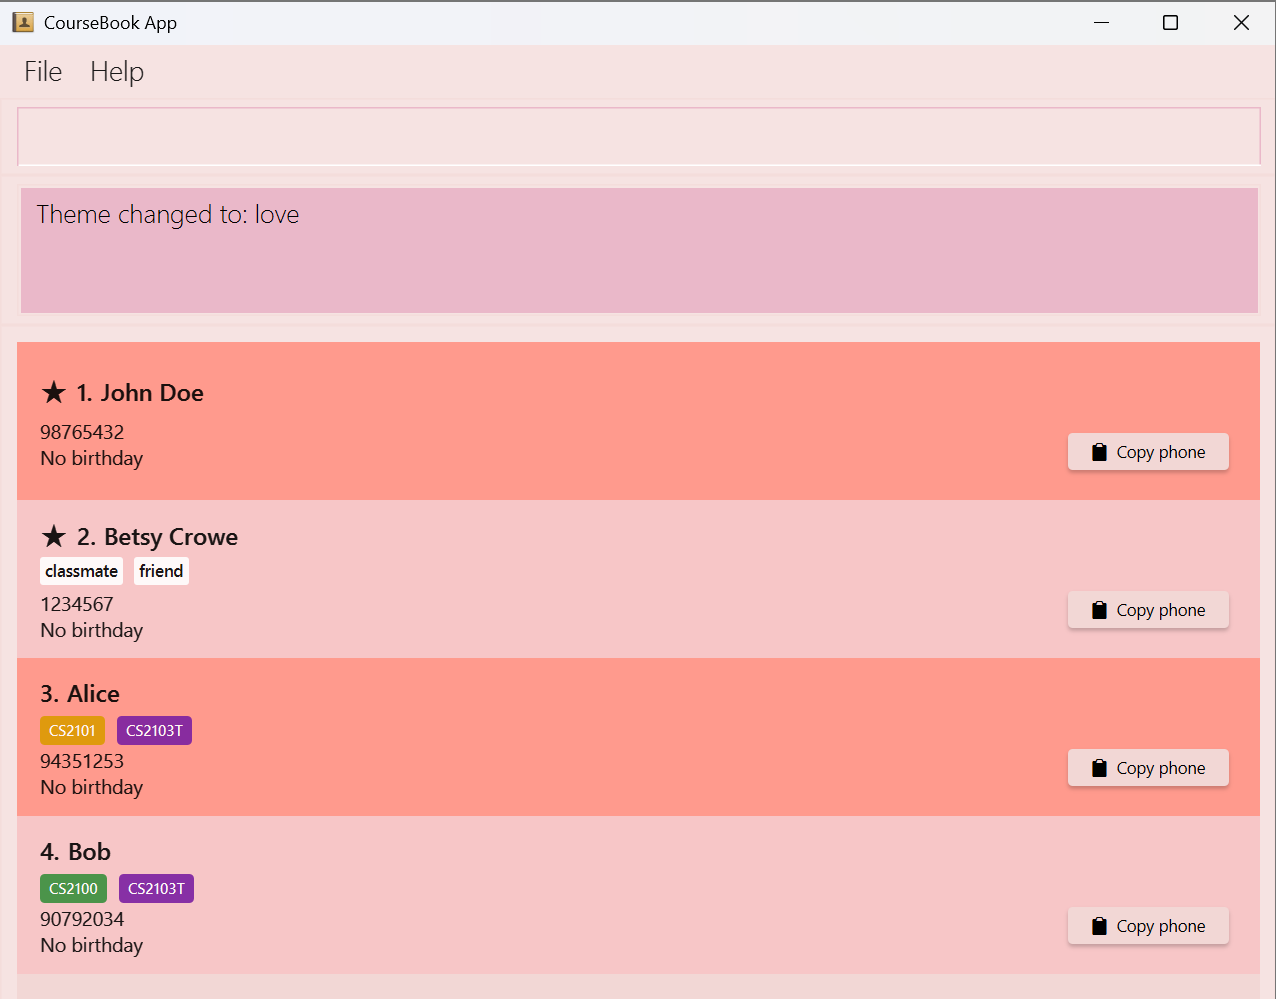 Figure 14: Changes to love theme.
theme tree
 Figure 15: Changes to tree theme.
Expected Output:
Theme changed to: tree
Error Messages:
-
"Invalid theme name. Available themes: dark, blue, love, tree"— Unrecognized theme -
"Theme is already <current_theme>!"— Trying to switch to current theme
Related: Undoing commands
4.4 Sorting Commands
4.4.1 Sorting by name: sortn
Sorts the contact list by name in ascending or descending order.
Format: sortn by/ORDER
Parameters:
-
by/ORDER(Required) — Sort order:asc(ascending A-Z) ordesc(descending Z-A)
Behavior:
- Case-sensitive order matching (ASC/DESC/AsC/dEsC are invalid)
- Sorts by person’s full name
Examples:
sortn by/asc
Sorts names A to Z
sortn by/desc
Sorts names Z to A
Expected Output (with results):
Sorted contacts by name in ascending order.
Expected Output (empty list):
No contacts to sort by name.
Error Messages:
- Incorrect format if order is missing or invalid
Related: Sorting by birthday, Listing persons
4.4.2 Sorting by birthday: sortb
Sorts contacts by how soon their next birthday occurs.
Format: sortb
Parameters: None
Behavior:
- Contacts with upcoming birthdays appear first
- Contacts without birthdays are placed at the end
* Use this command to see whose birthdays are coming up soon.
* Combine with
favs to see favourite contacts’ birthdays first: favs followed by sortb. Example:
sortb
Sorts contacts by upcoming birthdays
Expected Output (with results):
Sorted contacts by upcoming birthday.
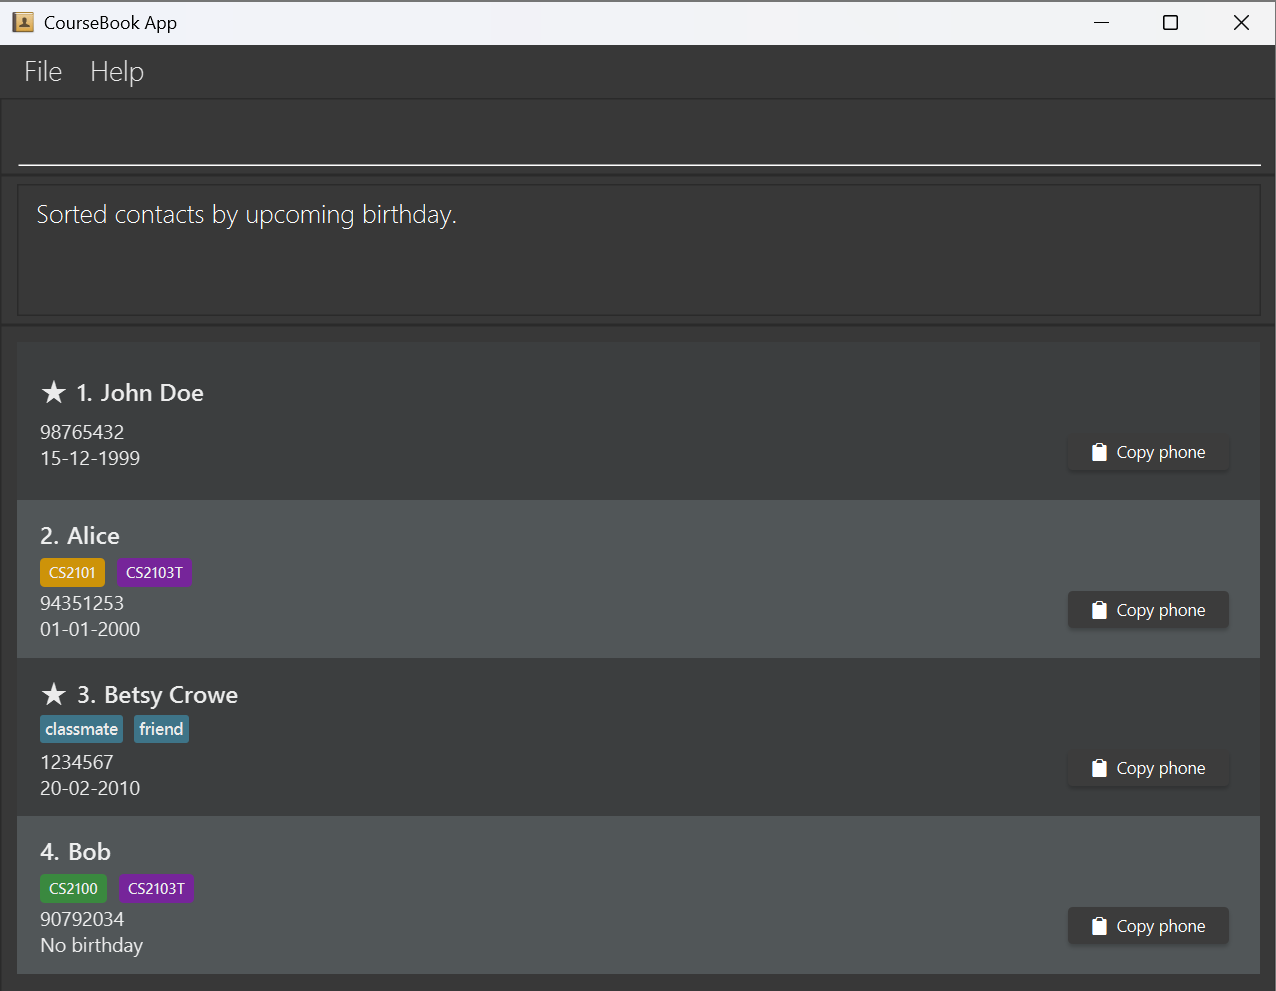 Figure 16: Sorted contacts.
Expected Output (empty list):
No contacts to sort by birthday.
Related: Adding birthdays, Sorting by name
4.5 History and Information Commands & Features
4.5.1 Viewing command history: history
Shows all commands executed in the current session.
Format: history
Parameters: None
Behavior:
- Commands are listed from most recent to oldest (reverse chronological order)
- Each command is numbered starting from 1
- History is cleared when the application is closed
Example:
history
Expected Output:
History (from latest to earliest)
- add n/John Doe p/12345678 e/john@example.com a/123 Main St
- list
- find alex
- delete 1
Expected Output (no history):
No commands in history!
Related: Undoing commands
4.5.2 Viewing summary statistics: summary
Shows a summary of all contacts with breakdown by course enrollment.
Format: summary
Parameters: None
Behavior:
- Displays total number of persons
- Shows enrollment counts for each course
- Courses are sorted alphabetically
- Handles persons with multiple courses correctly
Example:
summary
Expected Output:
Summary: 15 person(s) found

Breakdown by course:
[CS2030S]: 5 enrollment(s)
[CS2040S]: 8 enrollment(s)
[CS2101]: 6 enrollment(s)
[CS2103T]: 10 enrollment(s)
Expected Output (empty coursebook):
Course book is empty. Please add persons before viewing summary.
Related: Listing courses, Listing by course
4.5.3 Navigating command history: Arrow keys
CourseBook lets you scroll through your previously entered commands using the ↑ (up arrow) and ↓ (down arrow) keys, just like in a terminal.
- Press ↑ to go back to the last command you typed.
- Press ↑ again to keep going further back through your command history.
- Press ↓ to move forward to more recent commands (after you’ve gone back).
This feature makes it easy to repeat, tweak, or re-run past commands without having to retype them from scratch.
4.6 General Application Commands
4.6.1 Viewing help: help
Opens the help window displaying all available commands.
Format: help
Parameters: None
Behavior:
- Opens a help window with a table of all commands
- Shows command names, descriptions, and examples
- Includes a link to the full User Guide
- Has a “Copy URL” button to copy the User Guide link to clipboard
Example:
help
Expected Output:
Opened help window.
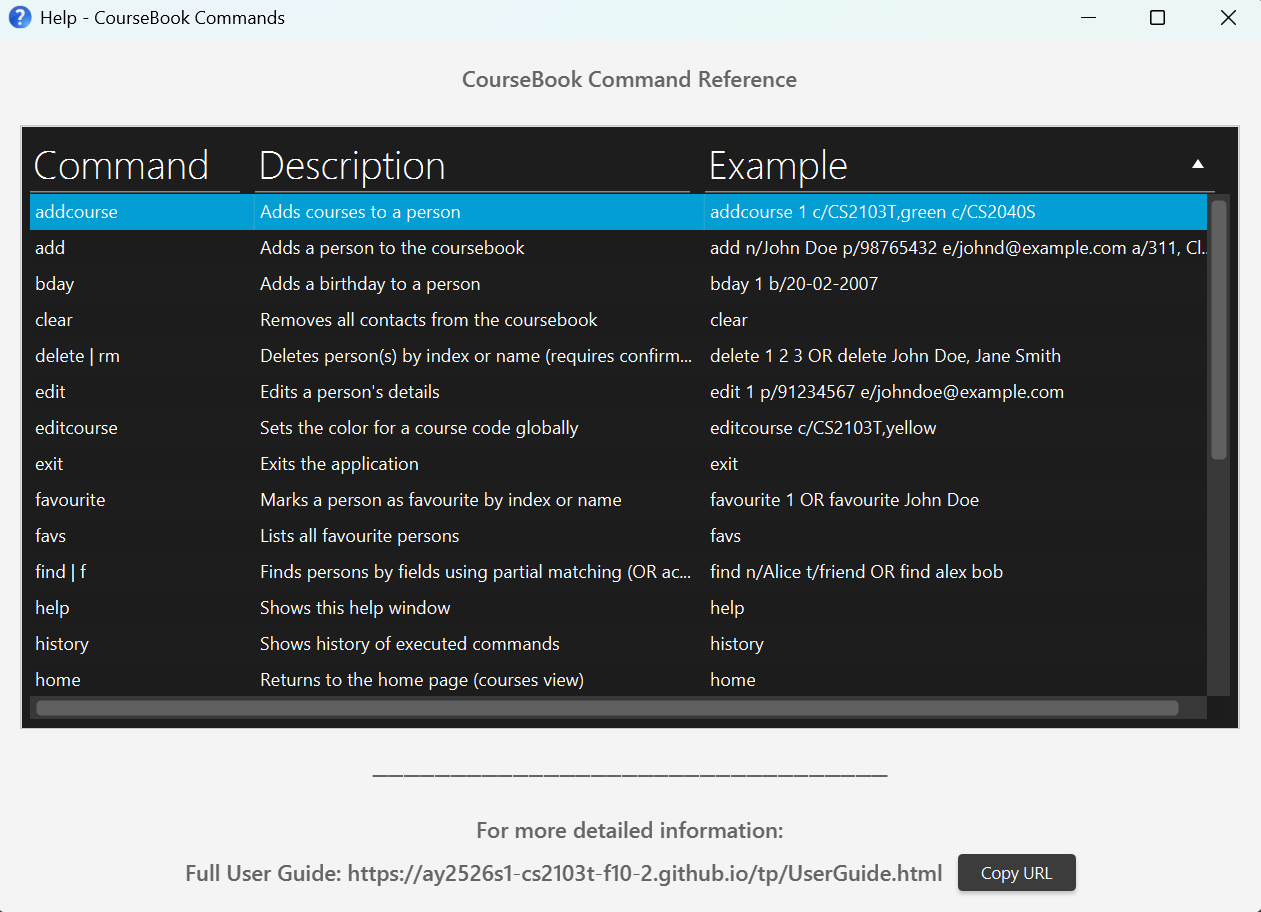 Figure 17: Help window showing command summary table.
* Use keyboard shortcut
F1 to quickly open the help window. * Click “Copy URL” in the help window to get the link to the full online User Guide.
Related: Command summary table
4.6.2 Clearing all entries: clear
Removes all contacts from the coursebook.
Format: clear
Parameters: None
* Consider exporting your data file before using this command.
Example:
clear
Expected Output:
Course book has been cleared!
Related: Undoing commands, Data storage
4.6.3 Exiting the program: exit
Exits the CourseBook application.
Format: exit
Parameters: None
Behavior:
- Saves all data automatically before exiting
- Closes all windows (main window, help window, etc.)
Example:
exit
Related: Data storage
4.7 Undo & Redo
4.7.1 Undoing commands: undo
Reverts the last command that changed a person’s details or the CourseBook theme.
Format: undo
Parameters: None
Behavior:
- Commands that can be undone are
add,delete,edit,bday,favourite,unfavourite,addcourse,removecourse,editcourse,theme,clear,redo - Commands that cannot be undone are
list,favs,find,viewperson,listcourses,list c/,sortn,sortb,history,summary,help,exit - Can undo multiple times in sequence
- After undo, the view switches to show all persons
* You can undo multiple commands by running
undo repeatedly. * Use
redo to reapply undone commands if you change your mind. Example:
undo
Expected Output:
Undo success!
Error Messages:
-
"No more commands to undo!"— No undoable commands in history
Related: Redoing commands, Command history
4.7.2 Redoing commands: redo
Reapplies the last undone command.
Format: redo
Parameters: None
Behavior:
- Reapplies the last command that was undone
- Can redo multiple times in sequence
- After redo, the view switches to show all persons
Example:
redo
Expected Output:
Redo success!
Error Messages:
-
"No more commands to redo!"— No redoable commands
Related: Undoing commands
4.8 UI Features
4.8.1 Copy phone number to clipboard
Each person card has a copy button on the right side that copies the phone number to your clipboard.

Figure 18: Copy person’s phone number to clipboard.
How to use:
- Locate the person card in the person list panel
- Click the copy icon button on the right side of the card
- The phone number is now in your clipboard and can be pasted anywhere
* This is faster than manually selecting and copying phone numbers.
* Use this feature when you need to call or message a contact.
5. Command Summary
| Command | Purpose | Format | Example |
|---|---|---|---|
| add | Adds a person | add n/NAME p/PHONE e/EMAIL a/ADDRESS [t/TAG]... [c/COURSE[,COLOR]]... |
add n/John Doe p/98765432 e/johnd@example.com a/123 Main St c/CS2103T,yellow |
| edit | Edits a person’s details | edit INDEX [n/NAME] [p/PHONE] [e/EMAIL] [a/ADDRESS] [t/TAG]... |
edit 1 p/91234567 e/johndoe@example.com |
| delete / rm | Deletes person(s) (requires confirmation) |
delete INDEX [INDEX]... OR delete NAME[, NAME]...
|
delete 1 2 3 OR delete John Doe, Jane Smith
|
| list / ls | Lists all persons | list |
list |
| list / ls | Lists persons in a course | list c/COURSE_CODE |
list c/CS2103T |
| find / f | Finds persons by fields | find [n/NAME] [p/PHONE] [e/EMAIL] [a/ADDRESS] [t/TAG]... |
find n/Alice t/friend |
| viewperson | Views detailed person info |
viewperson INDEX OR viewperson NAME
|
viewperson 1 OR viewperson John Doe
|
| bday | Adds birthday to a person | bday INDEX b/BIRTHDAY |
bday 1 b/20-02-2007 |
| favourite | Marks person as favourite |
favourite INDEX OR favourite NAME
|
favourite 1 OR favourite John Doe
|
| unfavourite | Removes favourite status |
unfavourite INDEX OR unfavourite NAME
|
unfavourite 1 |
| favs | Lists all favourite persons | favs |
favs |
| addcourse | Adds courses to a person | addcourse INDEX c/COURSE[,COLOR] [c/COURSE[,COLOR]]... |
addcourse 1 c/CS2103T,yellow c/CS2101 |
| removecourse | Removes courses from a person | removecourse INDEX c/COURSE [c/COURSE]... |
removecourse 1 c/CS2103T c/CS2101 |
| editcourse | Sets course color globally | editcourse c/COURSE,COLOR |
editcourse c/CS2103T,red |
| listcourses | Lists all courses | listcourses |
listcourses |
| sortn | Sorts contacts by name |
sortn by/ORDER (asc or desc) |
sortn by/asc |
| sortb | Sorts contacts by birthday | sortb |
sortb |
| theme | Changes application theme |
theme THEME_NAME (dark, blue, love, tree) |
theme blue |
| summary | Shows summary statistics | summary |
summary |
| undo | Reverts last change | undo |
undo |
| redo | Reapplies last undone change | redo |
redo |
| history | Shows command history | history |
history |
| clear | Removes all contacts | clear |
clear |
| help | Opens help window | help |
help |
| exit | Exits the application | exit |
exit |
6. Data & Storage
6.1 Automatic Saving
CourseBook automatically saves your data after any command that changes the data. There is no need to save manually.
Data File Location: [JAR file location]/data/CourseBook.json
Preferences File Location: [JAR file location]/preferences.json
6.2 Editing the Data File
Advanced users can update data directly by editing the CourseBook.json file.
6.3 Transferring Data to Another Computer
To transfer your CourseBook data:
- Install CourseBook on the new computer
- Run it once to create the data folder structure
- Replace the empty
CourseBook.jsonfile with your existing data file - (Optional) Copy
preferences.jsonto preserve window settings
7. FAQ
Q: How do I transfer my data to another computer?
A: Install CourseBook on the new computer and replace the empty data file it creates with your existing CourseBook.json file. See Section 6.3.
Q: Why does delete show a confirmation dialog?
A: This is a safety feature to prevent accidental deletions. Always review the confirmation dialog before clicking “OK”.
Q: Can I undo a clear command?
A: Yes, use the undo command immediately after clear to restore all contacts.
Q: How do I change a person’s birthday?
A: Use the bday command with a new date. If the person already has a birthday, it will be updated (unless it’s the same date, which will fail).
Q: Can I search by partial names?
A: Yes, the find command uses partial/substring matching. find n/ali will match “Alice”, “Alicia”, etc.
Q: Do course colors apply to all persons with that course? A: Yes, course colors are global. Changing the color for CS2103T will update it for everyone enrolled in CS2103T.
Q: What happens if I enter an invalid command?
A: CourseBook will display an error message explaining what went wrong and suggest the correct format. If unsure of a command, use the help command to view the command summary.
8. Known Issues
Issue: When using multiple monitors, if the application window is moved to a secondary screen and that screen is later disconnected, the application may open off-screen and appear invisible.
Cause: The application remembers its last window position using a preferences.json file. If that position was on a monitor that’s no longer connected, the window may launch outside the visible area.
Workaround: Delete the preferences.json file before launching the application again. This resets the window position to its default location on the primary screen.
9. Glossary
| Term | Definition |
|---|---|
| Case-Insensitive | Search/matching that ignores uppercase/lowercase differences |
| CLI | Command Line Interface — text-based interface where users type commands |
| Course Code | Unique identifier for a course (e.g., CS2103T, CS2101) |
| favourite | Contacts marked with a star (★) for quick access |
| GUI | Graphical User Interface — visual interface with buttons, windows, and icons |
| Index | Position number of a person in the currently displayed list (1-based) |
| JAR | Java Archive — executable file format for Java applications |
| JSON | JavaScript Object Notation — file format used to store CourseBook data |
| Parameter | Information you provide to a command (e.g., name, phone, email) |
| Partial Match | Search that finds results containing the keyword (e.g., “ali” finds “Alice”) |
| Prefix | Letters followed by / that identify a parameter (e.g., n/ for name) |
| Tag | Label you assign to contacts for categorization (e.g., “friend”, “classmate”) |
End of User Guide
For support or to report issues, visit our GitHub repository.